Passkey Registration Ceremony
This is the second post in a multi-part series covering passkeys (or WebAuthn). Each post builds on previous posts in the series, so catch up if needed before continuing.
Table of Contents
- Introduction
- The Registration Ceremony (current)
- The Authentication Ceremony
- FIDO Metadata
- The Packed Attestation
- Implementing a Virtual Authenticator
Note: will be updated as more posts are completed
The registration ceremony is the process by which a credential (public / private key) pair is requested from the authenticator. This post will focus on the creation process from the perspective of a browser as that is the most common use case, but the underlying C API is quite similar to the browser, albeit more low level.
Note: All specifications linked throughout this document are up to date at time of writing, remember to check for updated specifications before implementing.
Before we begin, a few terms must be defined:
Authenticator: The device providing credentials upon request. This will likely be a password management tool, like 1Password, or a physical authenticator, like a Yubikey.Relying Party: The service providing the passkey creation options and storing the public key from the authenticator. This service must have a unique id that identifies it to the authenticator.Session Store: A store holding values which are attached to a device (usually through a cookie). The store must properly secure the values to prevent them from being tampered with.
The below diagram provides a general flow of the passkey registration ceremony. The grey box along the Relying Party line indicates the need for a singular value to be persisted into a session and for how long it must be persisted.
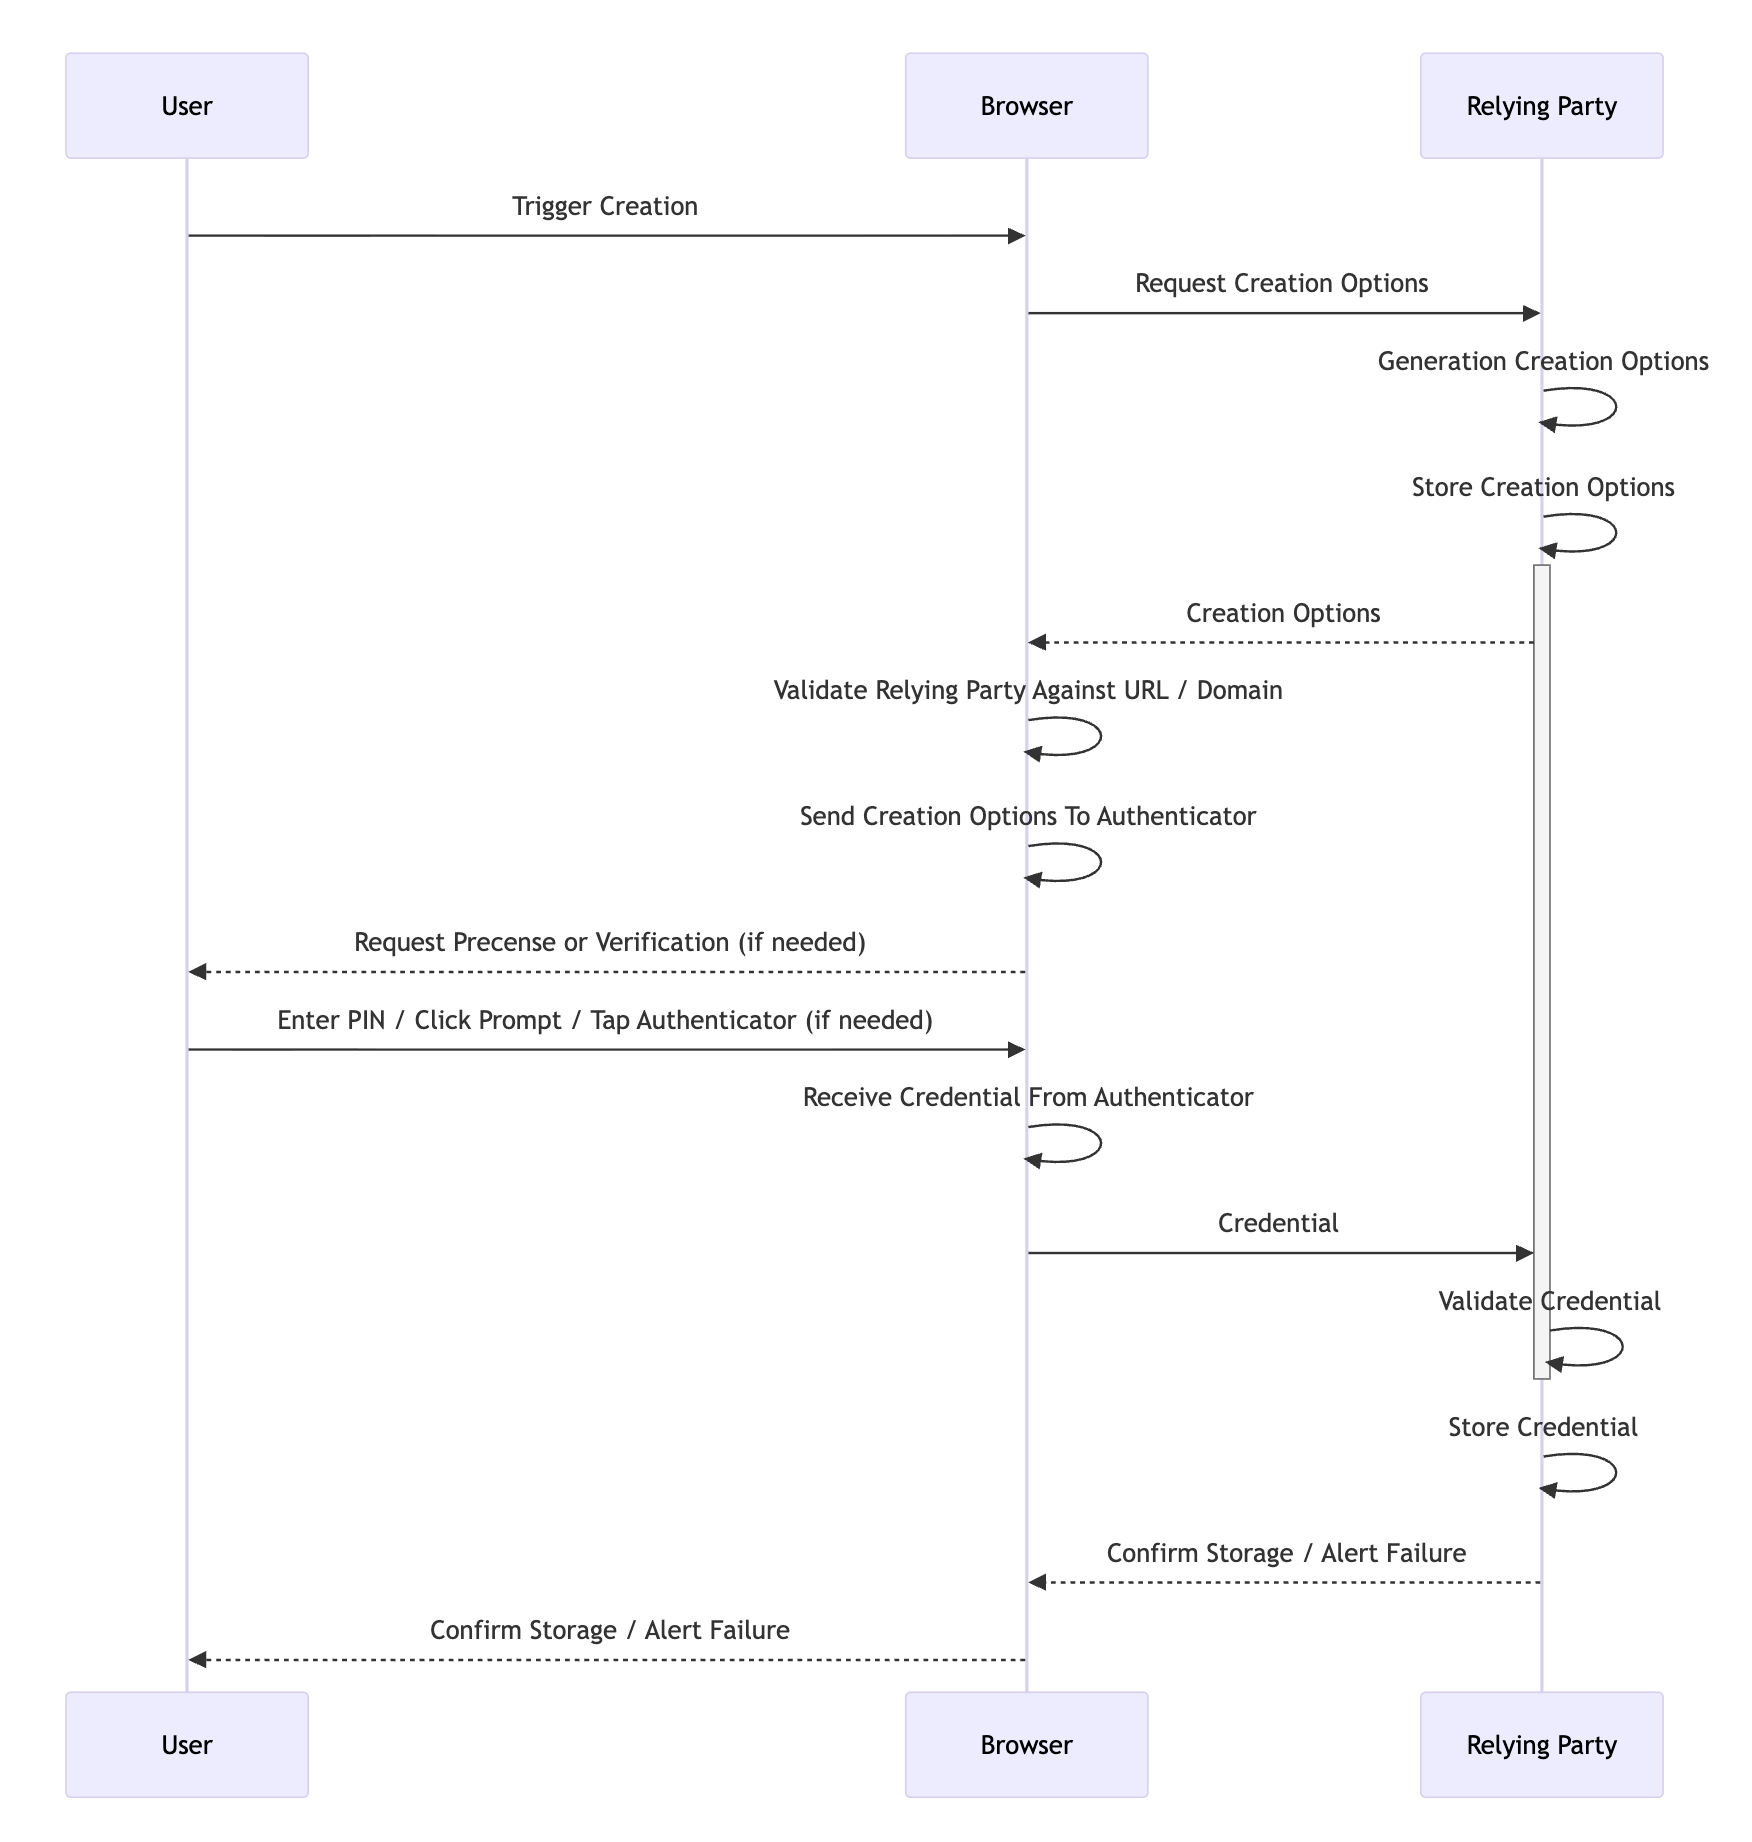
The ceremony has a few distinct phases: the trigger, generation of the creation options, generation of the credential, and validation of the credential. The creation options must be safely stored by the Relying Party from the start of the process to the end. However stored, the options must be free from tampering to provide the security guarantees that WebAuthn promises. Storage is usually done via a backend system like Redis where the options expire after a short timeout, usually a few minutes at most.
For our purposes, we will use the standard use case for WebAuthn. The user will be visiting a website, the Relying Party will be the website itself, and the authenticator will be a hardware authenticator. The trigger is easy enough, the user either visits a registration page, or clicks a button on the site that initiates registration. Some basic information might be collected (like name, email, etc.) but this is not strictly required. Provided the site can generate a unique id for the user, it is certainly possible to collect no data at all.
The generation of the credential options comes next. Here the Relying Party has numerous options that can be supplied to the authenticator in the form of a JSON payload. We discuss what each field does after the example payload.
{
  "attestation": "none (default) | enterprise | direct | indirect",
  "attestationFormats": ["packed | tpm | android-key | android-safetynet | fido-u2f | apple | none | ..."],
  "authenticatorSelection": {
    "authenticatorAttachment": "cross-platform | platform",
    "requiresResidentKey": "boolean",
    "residentKey": "discouraged (default) | preferred | required",
    "userVerification": "discouraged | preferred (default) | required"
  },
  "challenge": "string",
  "excludeCredentials": [{
    "id": "string",
    "type": "public-key",
    "transports": ["ble | hybrid | internal | nfc | usb"]
  }],
  "extensions": {},
  "hints": ["security-key | hybrid | client-device"],
  "pubKeyCredParams": [{
    "alg": "number",
    "type": "public-key"
  }],
  "rp": {
    "id": "string",
    "name": "string"
  },
  "timeout": "number",
  "user": {
    "displayName": "string",
    "id": "string",
    "name": "string"
  }
}
attestation: a value ofnoneindicates the Relying Party is not interested in the properties of the authenticator (firmware, name, etc),direct / indirectindicate that basic properties of the authenticator are requested withindirectindicating that anonymization can take place,enterpriseindicates that full details including the serial number of the authenticator if available are requestedattestationFormats: this optional array tells the authenticator which format the Relying Party would like the attestation object to be in. Note that this property can be ignored, especially by hardware authenticators which may only supportpackedauthentication due to memory constraints.authenticatorSelection.authenticatorAttachment: if left blank, either is considered acceptable, ifplatformthe authenticator must be part of the device providing WebAuthn capabilities, ifcross-platformthe authenticator can be an external, transportable device.authenticatorSelection.requiresResidentKey: a boolean determining whether a resident (or discoverable) credential is required. A discoverable credential is a credential that can be used on platforms not receiving a credential id, or put more plainly, the Relying Party does not need to provide a list of possible credential ids in theallowCredentialsarray for this credential to be used for authentication. This field is deprecated, useauthenticatorSelection.residentKeyinstead.authenticatorSelection.residentKey: controls whether the authenticator should create a resident (discoverable) credential, with theRKflag in the response confirming the outcome.authenticatorSelection.userVerification: controls whether the authenticator should request the user verify themselves (with a PIN or fingerprint), with theUVflag in the response confirming the outcome. This is different from user presenceUPwhich simply means the user indicated they were present during credential creation.challenge: the string to be stored in and hashed with theclientDataJSONthen signed. This should be random each time and sufficiently long to prevent replay attacks.excludeCredentials: any authenticators that should be excluded because they are already registered by the user.extensions: several extensions are available in the WebAuthn specification. These include the ability to force a user to choose a pin of minimum length, whether the authenticator itself should require user verification rather than the Relying Party (for additional protection), and the option to include metadata with the credential among others.hints: these allow Relying Parties to control the browser registration experience to an extent, potentially skipping platform options like macOS's Touch ID for example.pubKeyCredParams: which public key generation algorithms are requested. Each algorithm is referred to by its COSE number.rp.id: the domain of the Relying Party. Note that this must be the domain strictly:example.comnothttps://example.com.rp.name: a nice name for identifying the Relying Party.timeout: a hint (in milliseconds) for the maximum amount of time that registration can take.user.displayName: usually the name of the user likeJohn Doe.user.id: a unique identifier for the user, like a UUID.user.name: a display version of theuser.id, commonly the user's email or username for the website.
Once the options are generated, they are provided to the authenticator via the standard browser API navigator.credentials.create({options}). The browser must validate that the site in question is authorized to use the rp.id before it can ask the authenticator to generate a credential.
That validation process includes two checks. For websites, the rp.id must be a valid domain. The current website must either be a subdomain of the rp.id (for example, rp.id is example.com and current website is sub.example.com) or rp.id must expose a /.well-known/webauthn endpoint listing the current website as an officially supported origin. This is the step that gives WebAuthn its famed phishing resistance.
Should validation succeed, the credential is returned to the relying party. The relying party must now confirm the credential conforms to the options provided, and if it does not, validation errors must be returned to the user alerting them that their authenticator does not meet the requirements of the site or that registration failed for some other reason. An example credential is provided, then a discussion of the fields and validations needed on each follows.
{
  "authenticatorAttachment": "cross-platform | platform",
  "id": "string",
  "rawId": "string",
  "response": {
    "clientDataJSON": "string",
    "attestationObject": "string",
    "transports": ["ble | hybrid | internal | nfc | usb"],
    "authenticatorData": "string",
    "publicKeyAlgorithm": "number"
  },
  "type": "public-key",
  "clientExtensionResults": {}
}
authenticatorAttachment: indicates whether the authenticator that produced this credential is a platform authenticator (built into the device) or a cross-platform authenticator (like a USB security key). IfauthenticatorSelection.authenticatorAttachmentwas provided in the creation options, this field should match. If it was not provided, the backend supports either option.idandrawId: a unique id assigned to the credential by the authenticator. The Relying Party must store this id and use it to exclude credentials in theexcludeCredentialsarray of future creation options or to allow credentials in theallowCredentialsarray of the authentication options.response.clientDataJSON: a simple JSON response that provides the data the authenticator received back to the Relying Party. The Relying Party must validate that thetypeiswebauthn.create, thechallengematches the one provided in the creation options, and theoriginmatches the expected origin.
{
  "type": "webauthn.create",
  "challenge": "8F2o-uHH0b4OXQh4p4FJgw",
  "origin": "https://example.com",
  "crossOrigin": false
}
response.attestationObject: contains a signed response from the authenticator with data about the authenticator as well as the public key. The overwhelming majority of the verification process occurs here. The attestation object is CBOR-encoded and contains three fields:fmt: the attestation statement format (e.g.,packed,tpm,fido-u2f,none, etc.). This must be one of the formats requested inattestationFormatsif that option was provided.attStmt: the attestation statement itself, which contains the signature and (depending on the format) the certificate chain used to sign the credential. This is what allows the Relying Party to verify the authenticity of the authenticator if desired.authData: the authenticator data, which contains the RP ID hash, flags, signature counter, the credential public key, and any authenticator extensions. The flags are particularly important during validation:UP(User Present): confirms the user was physically present during the ceremony. This is almost always set during registration.UV(User Verified): confirms the user was verified via a PIN, biometric, or other method. IfuserVerificationwas set torequiredin the creation options, this flag must be set.AT(Attested Credential Data): indicates that the authenticator data contains the credential public key and credential id. This must be set during registration.BE(Backup Eligible): indicates whether the credential is eligible for backup (e.g., synced across devices by a software authenticator).BS(Backup State): indicates whether the credential is currently backed up.ED(Extension Data): indicates that the authenticator data contains extensions. If present, the extensions are CBOR-encoded and appended after the attested credential data.
The authenticator data also contains the
signCount, a counter that the authenticator increments with each operation. The Relying Party should store this value for comparison during future authentication ceremonies to help detect cloned authenticators.Note: Not all authenticators support signature counters. Some always return
0. The Relying Party must account for this case by skipping the counter check when both the stored and returned values are0.If the Relying Party requires specific authenticator characteristics, additional checks can be performed here. The AAGUID embedded in the authenticator data can be used to look up the authenticator in the FIDO Metadata Registry to confirm the manufacturer, certification level, firmware version, and other properties. Some extensions like
credProtectare also verified within the authenticator data rather than inclientExtensionResults.response.transports: which communication transports the authenticator provides (or has enabled). The Relying Party should store this alongside the credential so it can be provided in theallowCredentialsarray during future authentication ceremonies, helping the browser locate the correct authenticator more efficiently.response.authenticatorData: the raw authenticator data bytes, provided separately from the attestation object for convenience. This contains the same data as theauthDatafield within the attestation object.response.publicKeyAlgorithm: which public key generation algorithm was used. This must be one of the algorithms listed in thepubKeyCredParamsarray of the creation options.type: at the time of writing,public-keyis the only valid value.clientExtensionResults: if extensions were requested, this object will contain the results for most extensions. For example, if thecredPropsextension was requested, arkboolean will indicate whether the credential was created as a discoverable credential. Not every extension reports results here — some likecredProtectare checked in theresponse.attestationObjectauthenticator data instead. If an extension was requested but is not present in the results, it may mean the authenticator does not support it, which may or may not be a registration failure depending on the Relying Party's requirements.
Once the registration succeeds, fails, or times out, the Relying Party should destroy the creation options, and that's it! The registration ceremony is complete. The authentication ceremony is next.
Want to try out the registration ceremony yourself? Give the developer tools from Yubico a try.